Monday 30 January 2012

Facebook Timeline and Your Cover Image


Facebook Timeline is going to be introduced to all users in the coming weeks whether we like it or not. Many have already been using Timeline since the end of last year. I resisted the change until the weekend, when I switched to the new format. If you're not sure how to do that, then click here.

The new format allows a much larger cover image to be displayed on your wall, and this is where I had a bit of fun. Using Big Huge Labs' Mosaic Maker, I selected the number of rows and columns (either 3 x 7 or 3 x 6 will work) and then chose images straight from my flickr account.  There are several ways you can add images via flickr and they're spelled out in the Mosaic Maker page. Once you're happy with your selection simply save it to your computer and then you're ready to upload it to Facebook. You can change your cover image any time and Facebook saves your cover images in their own folder within your images.

Of course there are other more creative ways to display the front cover image but I found this way to be quick, easy and didn't involve having to allow other applications access to my Facebook account.


Embrace the change. Whinging about the new format isn't going to bring back the old. Go get creative with your cover image!

Friday 27 January 2012

Week 4 ~ "From a High Angle"


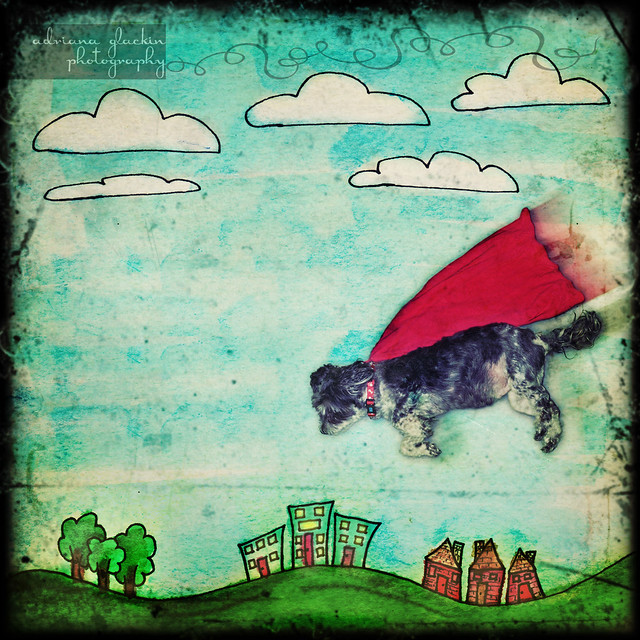
 super scruffy
Not your usual interpretation of this phrase, but I wanted to create something that was a little bit of fun and a whole lot of silliness. I had seen an image where the object was overlaid onto a blackboard background - but do you think I can find it again so I can link you? No! It's been bugging me all week and I've tried all the keyword combinations to no avail. If you've seen other examples, I'd love for you to link me to them. Just pop the link in the comments :)
You'll be surprised to know that I didn't hire a Cessna and launch my dog from it in order to create this image. The 'high angle' in this shot, involved me standing on tip toes on a kitchen chair. I had my dog lay on a piece of green fabric then I arranged a red t-shirt above him so it would look like a superhero's cape. In PS, I erased the green background and then duplicated the dog layer onto a drawing I had done and scanned into PS. I added a couple of textured layers and then applied a fake TtV brush I had made in PS over the top of the previous layers. To create the impression that Super Scruffy is flying, I duplicated the back portion of him and pasted that onto a new layer then applied motion blur to the new layer. A few more tweaks with curves and some dodging and burning and this is the final result.
Another week is done. You know, the scary thing about a project like this, is it forces you to notice the passing of time. People, we are already four weeks into the new year....gulp!

Friday 20 January 2012

Week 3 ~ RED


 ~ still life with pomegranate ~

As I mentioned in my post last week, I usually start thinking about the following week's theme while I'm still working on the current theme. The recurring thought I had with the theme of "red" was a still life. While it's possibly been done to death, I also wanted to include a pomegranate. I'm sure I would use more of that fruit in cooking if I could buy it already seeded. I know that it is available as I've seen Nigella use the pre-packaged seeds, but I've not been able to find it, so maybe it's a UK thing and not an Australian thing. So, back to the still life, I've also included a lighting diagram to show you the set up. I used a black background, not white as per the diagram and at one stage I toyed with a red gel, but that didn't look effective so i removed it.  I absolutely resisted the urge to use any textured layers to give it an aged or painterly feel - I wanted a straight-up image for this week's theme.  Short and sweet this week, I hope you like it. Bring on week 4!

Tuesday 17 January 2012

Week 2 ~ Clouds


Last week's theme for the 52 Captures was "clouds". As I'm only committing to one photo a week with this project, I didn't want to simply take a photo of clouds. My intention, in doing this project, is to push myself creatively and photographing a landscape with photogenic clouds wasn't what I was after. And a very big thank you this week to Aerokev, who I have roped in encouraged to participate in this challenge.

 ~ the heart cloud ~

I had an idea floating around in my head and I simply had to rely on there being suitable clouds. So here's the workflow that took place over a series of days:

* Photograph clouds for 3 days in a row. The weather was conducive to gorgeous white scattered clouds that popped with detail when using the polarising filter.
* As often happens with an idea, I need to see it take shape in my imagination before I can actually then try and create it. Pondering the idea and how it will come together while sipping coffee and eating chocolate works for me...
* Time to upload the images and print up a contact sheet full of clouds. I then picked out the appropriately shaped ones and edited them in PS. The main shape I was after was a heart and it was a matter of putting the cloud jigsaw together.
* And of course, as often happens, what I imagined was not translating onto the screen. I did persist with the idea and instead of ending up with a sweet collage of abstract cloud images; I ended up with a very early 70's evangelistic, very bad stained-glass-effect that still makes me shudder when I view it. I dislike it so much that I don't dare upload it anywhere! Idea scrapped.
* Onto the next idea - I still wanted to keep the idea of a collage of clouds, this time though, I wanted the clouds to be floating up in the sky. I use a drawing program and so had to draw the grassy foreground, the string and sky. I then imported the files into PS and began blending the images together.
* It's important to blend the various elements so that they all look as though they belong, and this is where adding textures (my own used) comes in handy. I used 3 different textures, blended them in various modes (overlay, soft and multiply at varying opacities).
* The heart cloud still didn't look quite right, maybe if it was a little rounder and 'flyaway', and this is where the Liquify Filter in PS comes in handy. I used the bloat tool and found I needed several attempts before I was happy with the result; it's not a tool I use a great deal in PS.
* My now bloated heart balloon was taking shape (sorry...). I used the Warp Tool to make the string 'fit' the balloon. I also added a subtle Drop Shadow to the balloon to create a bit of distance between it and the sky.
* To create the shadow in the grass, I used the Burn Tool - in a separate layer - and burnt the shadow into the grass.
* Some final tweaking with curves and vibrancy and the image was done.
I should point out, that I was working on 4 versions of this at the one time - as I couldn't decide which version I preferred. The one I uploaded to the group wasn't the actual version I had settled on! Oops! As I don't know how to change it, there it remains.

The version I uploaded to the 52 Capture Group, a slightly muted, more sombre version.
Onto week 3 where the theme is 'RED'.

Saturday 7 January 2012

A New Year - a New Project

 
Well, well - Happy New Year! Did you make a New Year's resolution? No, neither did I. I only get disappointed when after a few days I abandon the resolution, so it's easiest not to even make one! I have embarked on a new photographic project though - and I can't tell you how pleased the family is about this! I've told them that it won't be as tough as Project365; this one only requires 52 photos - that's easy, right?
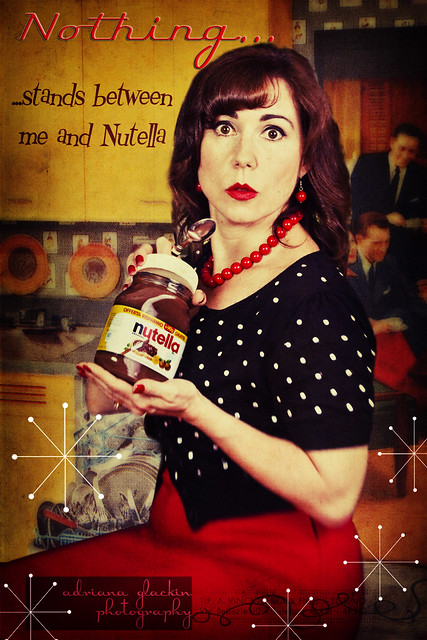
So with one day to go before the first deadline, I set about completing the task for week 1. Of course week 1 would be "self-portrait" but I decided to combine an idea for another challenge and create one photo. Some might say that's being lazy, I prefer to think of it as creative! The other challenge's brief was two-fold - "A new beginning" plus "texture".  So with those criteria in mind, I set about capturing the image. Setting up the lights and umbrellas, positioning the camera, taking test shots, then hair and make-up and then at the last minute I decided to change the lens. I swapped the nifty-fifty to the Lensbaby Composer which meant I had to grab a prop to sit where I would be sitting and find the focus spot.  After quite a few attempts and some fine tuning of the lens, I managed to get my eyes tack sharp, which was my aim. I then scoured through my 50's magazines to find an appropriate kitchen shot, in colour - it's wasn't common for magazines to be in full colour then; scanned the image into PS and incorporated that into my photo. I played with the individual curve layers to create a discoloured and retro look, before then scanning in some old and textured paper. I find that scanning rather than photographing the paper yields better results, as you can really bump up the dpi quite a bit. I used 3 of my old papers and applied them in soft light, overlay and multiply at varying opacities. I then added a couple of text layers and added the text, using retro fonts in keeping with the retro theme. Lastly, I felt it still needed a little something so I drew the retro starbursts and created some vignetting. From start to finish it probably took about 4 hours and I probably would have kept fiddling with it, but when you're working to a deadline, there comes a point where you need to stop.
I'll keep you up to date with each week, posting the image and blurb here, as well as posting the image over on Flickr. If you've started a Project52, link to it here, I'd love to follow your progress - and maybe I can link you in the side bar. The best part about the Project52 I'm following is the fact the weekly theme is spelled out for us - yeh! So, here's to 2012 - may you enjoy many creative moments and may you be surrounded by those you love.

Red Bubble Gallery

Red Bubble Gallery
view my photography at Red Bubble