Showing posts with label baking. Show all posts

Thursday, 26 June 2014

Nutella Bread and Butter Pudding - Yes, it's Gluten Free!

It's no secret that I love Nutella and that the only reason why I don't buy those ginormous jars of Nutella isn't because of price, but because it would mean I would need a whole new wardrobe. And who can be bothered with that. Everything in moderation, blah, blah, blah.

Anyway, the point of this post is to share a recipe I've tested out a couple of times, and one that's perfect for those cool, crisp and wild wintery days. Nutella Bread and Butter Pudding! Minus the butter...and this version is gluten free. I was inspired to create this version when I stumbled upon this one. Read on for the list of ingredients and method:
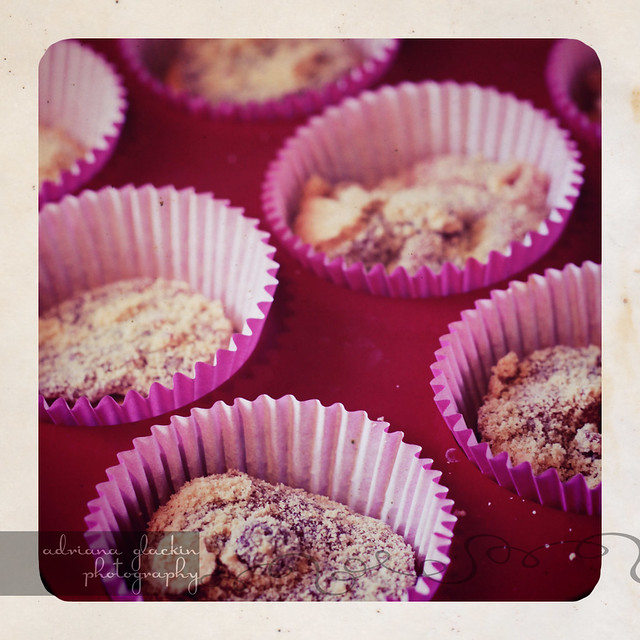
It's not pretty, but it's pretty delicious!


Ingredients:


1 loaf Gluten Free Bread*
1 jar of Nutella - be generous
400ml milk
600ml thickened cream
5 eggs
100g maple syrup**
dash of Marsala***
butter for greasing the baking dish


* I baked this loaf using Laucke Flour Gluten Free Bread Mix.
I also added the chocolate bits just in case the pudding wasn't chocolatey enough.
You can use store bought bread or your own bread recipe.

Method:


1. Preheat oven to 180 degrees celsius (fan forced)
2. Grease a largish baking dish with the butter. Generally gluten free loaves are smaller than standard loaves, you will still need a large baking dish.
3. Spread a generous amount of Nutella on each of the slices of bread, then cut into triangles. Don't be tempted to cut multiple slices at a time as Nutella is very sticky and the gf bread crumbly. Be patient and slice each piece one at a time. Or maybe use a sharper knife...maybe my cutting skills leave a lot to be desired...

Don't skimp on the Nutella. Be thorough in your coverage.


4. Arrange the Nutella triangles in the baking dish. You can be as neat or as messy as you like. Overlap the bread if that's what's going to make you happy. Sprinkle that dash of Marsala over the Nutella triangles. Consume any leftover Nutella triangles that don't fit into the baking dish...it would be rude not to...

Pack those Nutella triangles in together!

5. In a pan, pour the milk, cream, dash of marsala (yes, another little dash), the maple syrup, give it a stir and heat. While you wait for the mixture to come to an almost boil, whisk together the eggs. Gently pour the egg mixture into the hot milky mixture, whisking the whole time. Remove from the heat, whisking as it starts to slightly thicken. I then poured this mixture into a jug, with a spout, then carefully saturated the Nutella triangles. I could have poured the mixture straight from the pan onto the Nutella triangles, but I would have made a mess and I would have spilt the mixture all over the bench, it would have dripped on the floor, I then would have slipped on it while reaching for the paper towels to clean the mess up. The doorbell would have rung at that very moment and my friends would have arrived and been shocked at the mess and the ruined dessert and would have probably returned to their car and would have gone home, upset that their afternoon of eating a yummy dessert had been crushed. I wouldn't have been able to cry, as everyone knows you shouldn't cry over spilt milk. So, bearing all this in mind, it was easier to pour the mixture into the jug to begin with. You may not need to do this if you're not as clumsy as me.

Ensure all the bread is soaked with this warm eggy mixture.
6. Place the baking dish into a larger baking dish and half fill that with water. Cover the dishes with aluminium foil and place into the oven for 15 to 20 minutes. Test at about the 15 minute mark. If the mixture has set, then by all means turn off the oven and let the pudding rest while you gather the biggest bowl you have and grab the double cream from the fridge. If it's still not set, then be patient but don't get too distracted - you don't want to dry out the pudding by overbaking it! Once the pudding is cooked, then serve with some double cream or ice cream and enjoy!


Notes:

* There are quite a few gluten free ready baked breads on the market now, so you can choose from one of those. I've been baking some different varieties, but have found with a recipe like this one, sticking to a traditional style bread works best. Again, there are several gluten free bread mixes you can experiment with and I've had success with a few of them. I've also baked from scratch, but find these breads to be a lot heavier than traditional bread.
** You don't need to use maple syrup, you can use any sweetener of your choice. I tend to make this recipe for friends and so add the extra sweetener for their benefit. If you're trying to watch your sugar intake - which would be hilarious with a recipe such as this one - then eliminate the additional sweetener altogether.
*** Marsala is my dessert cooking wine of choice. You may prefer to use Kahlua or Frangelico or not use any alcohol at all.
Another note, you can make variations of this recipe - if you have a friend who, for example, doesn't like Nutella (is that even possible?  have you heard anything so preposterous?) (sorry P!!!) then butter and jam can be used. Sultanas or raisins can also be added, as per the original recipe that inspired this experiment.


I hope you try out this recipe, and if you do, then drop me a line and let me know how you got on with it. Do you experiment with recipes? What's your favourite Nutella recipe?

Monday, 22 April 2013

Anzac Biscuits - Gluten Free

It's been a while. Life has been busy and hectic, in a good way. I thought I'd share this quick recipe with you. The original can be found here. If you're looking for a gluten-free alternative, then the recipe below is my first attempt at making a gluten-free version of this biscuit.

Anzac Biscuits - Gluten-Free

Anzac Biscuits - Gluten-Free

Ingredients:


1 cup Almond Meal
1 cup Quinoa Flakes
1 cup shredded coconut
40g Butter *
85g Coconut Oil *
1/2 cup Coconut Palm Sugar
2 tbs Golden Syrup
1 tsp Bicarb Soda

Method:


The method follows the original recipe I have linked above, which is:

- Preheat oven to 160°C and line 2 trays with baking paper.
- Mix the almond meal, quinoa flakes, shredded coconut and bicarb soda together in a mixing bowl.
- Melt the butter, coconut oil, golden syrup and the coconut palm sugar in a pan. It will look like a brown thick-ish splodgy mess, but that's ok.
- Pour the melted mixture into dry mixture and stir with wooden spoon.
- Now, by this stage I stopped referring to the rest of the original Method and basically threw a spoonful of mixture onto the trays, so that when the whole thing was done - in 10 minutes - it was one ginormous Anzac biscuit! All was not lost, as I used a knife to separate the still warm biscuits and then waited for them to cool before calling the Official New Recipe Tasters, that is, the Family.
Anzac Biscuits - Gluten-Free
The raw biscuits are definitely not 5cm apart...And that's why it's important to read ALL the instructions...
Anzac Biscuits - Gluten-Free
One ginormous Anzac Biscuit for one, or 12 good size biscuits to share...your choice ;)
Freshly baked gluten-free Anzac Biscuits. A lot nicer looking than first batch! #food
EDIT: Batch No. 2, freshly baked. No butter, just coconut oil and a tablespoon of coconut flour

The Verdict? 

"You are making more of these, aren't you?", "Can I have another one?", "These are so nice, can you make more?"

* Note: I wanted to use a blend of both butter and coconut oil and the only reason for the 40:85 blend was that was all the butter I had in the fridge. If you're avoiding dairy, then you should be able to omit the butter and use coconut oil instead. I will try that version and post the results as an edit to this post.

These biscuits are super easy to make, take 10 minutes to bake and they're totally yummy. What's your favourite version of the Anzac biscuit? I'd love to hear your variations on this classic biscuit.

Happy baking :)

Thursday, 15 March 2012

Arnott's Raspberry Shortcake Mini Cheesecakes


Arnott's Raspberry Shortcake Mini Cheesecakes
Decorated with store bought and prepared icing mixture. This is optional.
Phew - now that's a mouthful of a recipe name and I thought I'd share this variation with you. Several weeks ago, the Teen was having a birthday and at his request I baked some mini Oreo cheesecakes. Now, I have to say that Oreos aren't my favourite biscuit, so I wanted to try an alternative cream biscuit and see whether the result would be as popular in our household.

To start with, I found the Mini Oreo Cheesecake recipe over at the Hey Gorgeous Blog and I've made this version a few times - they never last long in our house. For my version, I chose Arnott's Raspberry Shortcakes, but any round cream biscuit will do. I would have chosen Arnott's Monte Carlos but their oval shape meant they wouldn't sit nicely in the round patty tins.

Arnott's Raspberry Shortcake Mini Cheesecakes
Tip: Place the patty tins inside muffin pans or the mixture will distort the thin paper patty tin and you'll end up with an oddly shaped mini cheesecake.

Making the Raspberry Shortcake version, simply substitute the 2 packs of Oreos for 2 packs of Raspberry Shortcakes. As I don't have a food processor, crushing the biscuits means placing them in a zip-lock bag and bashing them with a rolling pin. That will definitely crush the biscuits to the right consistency but what makes these biscuits differ to the Oreos creamy centres is their jam centres - they won't crush due to their gelatinous nature. I didn't let that deter me as I placed the jam centre on top of the shortcake biscuit already in the base of the patty tin.

Arnott's Raspberry Shortcake Mini Cheesecakes
The gelatinous centres of the Raspberry Rounds - added an extra sweetness to this mixture.
For my next dastardly trick, and this is to ensure that I get to sample these mini cheesecakes, I also threw in a handful of sultanas. Obviously, if your family likes sultanas in their cakes and slices, this trick won't work and you'll have to think of something else to add that only you enjoy (eg carob and/or dark chocolate buttons, extra coconut, perhaps some cinnamon...).


 Arnott's Raspberry Shortcake Mini Cheesecakes Arnott's Raspberry Shortcake Mini Cheesecakes

There are so many variations possible with this simple yet delicious recipe. Grab a couple packs of your favourite round cream biscuit then follow the link and start baking.

Red Bubble Gallery

Red Bubble Gallery
view my photography at Red Bubble