Showing posts with label tips. Show all posts

Friday, 30 October 2009

Tips on How to Shoot Self-Portraits (or not)

The following tips, hints and how-to's are in no way to be viewed as being completely instructional, or even helpful... I just thought I'd clarify before you read any further. Anyway, let's begin to take a look at what's involved in taking Self-Portraits.


1. It's a good idea to use a prop, such as this teddy bear, as a point of focus - the aim is to replace the prop with yourself, of course.


2. If you have one, use a remote shutter release - they are really handy, as you don't have to rush back to the spot within 10 seconds (like I had to before I bought the shutter release) - oh, it's also a good idea to remember where the spot was, and to hide the remote from view...


3. If you're a little shy, then get a family member to join you in your Self-Portrait, especially when they also don't normally like having their photo taken. Then the two of you can learn to relax and go with the flow. Note: sitting with the reluctant family member and using a remote shutter is a stroke of genius that I wish I had thought of way before now.


4. The reluctant family member, who is by now enjoying this little photoshoot, may even pose and smile at just the right time. No, wait, this shoot is about taking Self-Portraits...sorry, but I couldn't resist adding this photo or this quite useless tip.


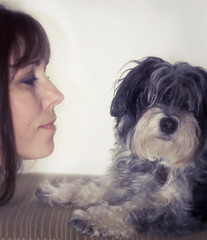
5. Taking a Self-Portrait doesn't always mean facing the camera. Have you thought of a profile pose?


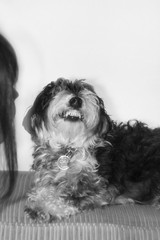
6. If you're not happy with a profile shot, there's always the stand-by "look-at-the-camera-with-a-semi-serious-expression", but don't be shy, fill the frame, don't hang around the edges....


7. Yes, while this is a Self-Portrait shoot, it's also good manners not to hog the camera and push the family member out of the way. There is room for both of you.


8. Placing yourself, or your subject in this case, in the centre of the frame isn't necessarily the wisest choice. Sometimes this can make for a very static and boring composition. Place yourself, or your subject to the side, leaving some negative space for the eyes to rest on.


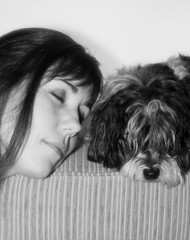
9. Who said your eyes need to be open when you're taking a Self-Portrait? Who said you even need to be awake when you're taking a Self-Portrait? These are questions you should ask yourself.


10. When using a prop as a focusing tool, it's a good idea to remove it completely from the shooting area. Unless of course you want to incorporate it in your Self-Portrait. In that case, it can make for a quirky element in your shot. Mind you, you can also crop the image, or clone it out.


11. If you're sharing your Self-Portrait with a family member, you don't need to have both of you in focus. In fact, it looks quite nice if only one of you is in focus, and the other is all soft and blurry. Using a shallow depth of field will mean the eye will be drawn to the part of the image in focus, in this case, the precious family member.


12. Use a Soft Focus, Cross-Screen or even Rainbow filter to give a soft and dreamy feel to your Self-Portrait. Using such a filter makes for a very forgiving image result.


13. A little bored with straight photography? Then why not incorporate some texture layers to add some interest and depth to your Self-Portrait. Either download these from around the web, or photograph your own, as I've done here. The number of layers and how you blend them will depend on what you're trying to achieve with your Self-Portrait.


I used my diffuser propped against a fairly bright window, camera on a tripod and a 50mm F1.8 lens. The 50mm is known as the "portrait lens" and the fact that it's only the f1.8 means it's called the "plastic fantastic". I also used a speedlite flash (just a teensy one) with a tissue as a diffuser to soften the effects of the flash.

If you haven't tried taking your Self-Portrait, give it a go, you might be surprised at just how much fun it can be. If you have taken your Self-Portrait, and can share some useful tips, feel free to comment in this blog - share your tips with others.

Saturday, 15 August 2009

How to Avoid “D’Oh!” Moments in Photography - 10 Bleeding Obvious Things to Remember before your next Photoshoot.


forest of impression II, originally uploaded by Adriana Glackin.


Homer Simpson has been having “D’Oh!” moments for over 20 years, which is funny when you’re an animated cartoon character. What isn’t so funny is when you have your own “D’Oh!” moments in real life. Then those moments become frustrating and annoying and you simply can’t believe you’d be that stupid and/or forgetful. Take this week for example. I planned a morning shoot about 40 minutes from home, I organised all my gear the night before. The plan was to test the Sigma 10-20mm lens that I’m playing with. I left home at my planned time, experienced no traffic along the way, arrived at the location, set up only to discover to my horror - the lens I had planned to shoot with was not in the car – D’Oh! But wait, it gets worse. I thought I would simply go with the flow and use another lens and shoot something else entirely. So far, so good. I continued with my shoot, alternating between lenses, subjects and locations and eventually made my way home. Uploading the images from the camera, I discovered that the photos from the first location were all out of focus – WHAT?! D’Oh! I checked the lens, as I had only used it for that location, and well, what a surprise, it was set at manual focus and I hadn’t even realised. Being myopic as I am, the images looked ok and they so clearly (pun...) weren’t. To add more insult to injury, the photos aren’t out of focus enough to be “arty”. They’re just rubbish.

The photography journey is riddled with D’Oh! moments. Sometimes we just don’t want to admit to them for fear someone will tap us on our shoulder and confiscate our camera gear. I can see it now – “Excuse me madam, I think I’ll take all this camera equipment from you. You clearly have no idea what you’re doing with all this.” So, to help you avoid your own D’Oh! moments in photography, below is a list of things to remember when you’re planning and attending your next shoot. They are all obvious and straight forward, but oh so easy to overlook. So before that mystery person comes up behind you tapping you on the shoulder and requesting you hand over your camera gear, take a look at the bleeding obvious:


1. Charge the camera battery the night before.

2. Make sure the back-up battery is also charged and in your camera bag. Today’s cameras are thirsty beasts.

3. Where are the memory cards you’ll be using? Is there one in the camera? Is it empty? If not, can those images be deleted? Place your spare memory cards in your camera bag. Now.

4. Are you meeting others for this shoot? Have you confirmed the time, place and date? You don’t want to attend the shoot in your pj’s because you didn’t have time to get dressed – although, as long as you have all your gear, the others would just think you’re eccentric, I guess. Tell them you do your best work when dressed in your pj’s.

5. If you know what you’ll be using for the shoot, gather it all together in the one place, so that you can pick it all up when you’re about to leave – no distractions when you’re doing this!

6. If you shoot a variety of subjects, before you commence your next shoot, check the camera settings. Sometimes in moments of distraction, this can be overlooked and the photographic moment can be lost.

7. Do you want to focus manually or let auto focus take over? Make your selection before you commence, and don’t rely on myopic eyes to approve of the image in the viewfinder. It won’t be artily OOF, I promise you that.

8. If you’re using a tripod and your lens has “image stabiliser”, then check whether it’s on or off. It should be set to off.

9. Get into the habit of putting your equipment back in the same spot each time. My camera bag has side pockets and a few internal pockets, and I try and place the same pieces of equipment in the same places. That way, at a glance I can see whether I have something missing.

10. If you have forgotten a crucial piece of equipment and can’t possibly commence the shoot, providing it’s not a client involved shoot, then simply sit back and enjoy your surrounds. You’ve obviously driven there because it was an appealing location, so enjoy it without a camera jammed up to your eye. It will certainly make a change to what you’re used to, and you might just see things you would have other missed.

If you can think of other absolutely bleeding obvious things to remember and you’d like to share, then pop in a comment, so that we can all laugh all learn from the bleeding obvious. Afterall, how else do we learn, but from our mistakes?

Sunday, 7 December 2008

To Delete or Not to Delete Digital Photographs

In part one, we talked about whether “To Print or not to Print” your images, or simply keep them on file. As we continue to embrace digital photography technology, we’re also increasing the number of images we take. So, what do you do with the less than perfect images? Do you keep or do you delete?

Well, I think you fall into one of two categories – the minimalists and the hoarders. Now me, I’m a hoarder. I simply can’t bear to delete an image, no matter how cruddy. There is nothing more calamitous than – gasp – deleting in-camera! Argh! How can you do that?! I recently spent some time with a sports photographer who was happily deleting images in-camera while showing me the images – what if there was a lapse in concentration and he deleted the wrong image? Argh! Obviously, he’s a minimalist as he felt more than comfortable deleting any image that wasn’t up to scratch.

Being the image hoarder that I am, I very rarely delete images, and certainly none in-camera. Rather, I categorise them in various files. As I also like to create image with multiple textured layers, this is where having a collection of images to use as a stock library, comes in handy.


In fact, take this image as an example.

Stock Image by Adriana Glackin

It’s less than crisp, fairly mundane and certainly not the type of fine art photography you hang on your wall. Now, my minimalist friend would have deleted it in-camera (mind you, he probably wouldn’t have shot it to begin with). But with some clever and creative alterations using editing programs such as Photoshop, this mundane image has been transformed quite dramatically into a piece that can be used as wall art and even a greeting card. Why buy someone else’s stock images when you can create your own stock images by simply keeping the less than perfect images on file.


Take a look at the examples to see some clever variations. For even more variations, visit the Grunge Art Photographic Gallery and A Photographer’s Craft and see for yourself why you too should be an image hoarder and not a minimalist!


Ode to Banksy by Adrian Rachele

A Semblance of Yearning by Karri Klawiter


Monday, 1 September 2008

Still Life Photography - Feature Monday

Boy, that's come around quick! Feature Monday...and this week I'm bringing you some examples of Still Life Photography. In my opinion, it would definitely have to be the safest form of photography - but that's where the simplicity ends. While you don't need to worry about your objects moving about, or throwing tantrums, or being generally off, or be subject to the weather, there is still much to consider before actually pressing the shutter. Yes, you can photograph your still life at any time you find works for you, and take your time with the shots, there is still a fine art, a skill involved in actually taking a still life photograph, to one that is simply a happy snap of some objects bunched together. Lighting, positioning, the objects chosen, the depth of field, the angle are some of the factors to consider when "staging" a still life photograph. What are you trying to portray to your viewer - is something else to consider - is there a message to your still life - is yet another factor to consider. And while it's true that you don't need to worry about being rained on, or injure yourself while out in the wilds - there's a lot more than meets the eye when it comes to still life photography.

Here are some examples to look at:


Harmonious Shells by Maria Madeiros


Lilies by Rose Atkinson


Still Hooked by Debbie Black


Nails and Nuts Figure by VashR31


still life by me :)

Monday, 28 July 2008

Fine Art Photography - Feature Monday

I was reading an on-line blog today and the topic was "Home Decorating Tips: Where to Hang Your Fine Art" and that got me thinking - now that I've learnt how to hang and how not to hang my fine art, the next decision is of course - what will I choose to hang on my walls? So, for this week, my top 3 images that I would love to hang on my walls would have to be these three - enjoy!


Red Bubble Gallery

Red Bubble Gallery
view my photography at Red Bubble